Showing posts with label Canva. Show all posts

Friday, May 26, 2017

Canva Update 2017

Canva has made a few changes since our last overview, so we thought that we'd go back and discuss how this program works. We still highly recommend trying this free online program out! If you make flyers or post images on social media, this is the website for you! If you found it a little hard to use before, they've made it more intuitive with the changes below.


When you log in, you start off by selecting what type of design you want to create. It can be anything from a flyer to a Facebook post. Once selected, it automatically brings you to a white screen that is the correct dimensions for your image.


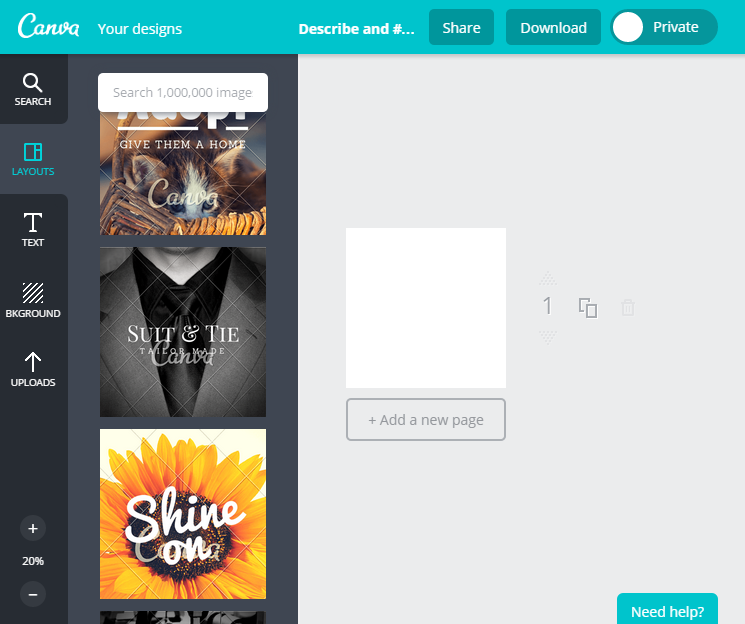
On the left side are a lot of layouts that you can use for free. You can easily change the words and background to fit what you want to make, but it is so useful to see great designs that you can mimic. They do have photos that you can use, though most of the good ones cost $1. I usually upload my own that I either took or use websites like Morguefile which have free pictures. (I don't even bother searching on Canva.)


In the image above, I want to mention a few great features. There's the "Share" button top right, which we'll talk about in more detail below. On the middle right is the double square which you can make a copy of your image. I use that all the time to make a duplicate of my templates and then I just update my words for this blog. Huge time saver!


If you don't like any of the layouts, you can scroll down and easily create your own with elements and text. I like that the text comes with many different styles, combining two different fonts that look awesome together. If you know what fonts you want, you can just make your own text blocks, too.


When you click on the image, options appear at the top of the screen. This is new from the previous version, which used to have the options appear in the middle of your image that you had to move around. I like this change, it makes it a lot easier when designing.


One of my favorite updates is the new share options (which we mentioned is located on the top right). Now it is really easy to share your images with other people and they can directly edit them! You can also make a team with seven other people. (This used to be a paid feature, but not anymore! By the way, nonprofit libraries do qualify for a free account of Work For Canva!) Your team will get to see all the images you mark is for the team and they can edit them. Very handy!


But it doesn't stop there. You can now share your images directly onto Facebook or Twitter without having to download and upload!

You can also make a link to your image which you can share with other people. Or you can turn your design into an interactive website, sharing this link directly with your patrons.


Lastly, you can now embed your design right onto your webpage so that all you need to do is save your image and your website is automatically updated. How cool would this be for your library's home page?


If you just want to download your image, you can do that with the "download" button. It can come in JPG, PGN, and PDF. 


Next to the "Download" button is the "Public" button. If you want followers on Canva, you need to make sure that you make your images public so that other people can see them. If you make a team, you need to make sure that you mark it as "show team" or they won't see your design. Everything defaults to private, so you don't have to worry about sharing something you didn't mean to share.

Happy designing!

For more articles on Canva, check out:

Canva for Work -- FREE for Libraries!
5 Secret Tricks for Using Canva Like a Pro
Canva: Make Easy Designs in Little Time

Friday, April 8, 2016

Canva for Work - Free for Libraries!


As you all know by now, I am a big fan of Canva. I've talked about it a few times on here... I cannot recommend it enough. It is the perfect program for people who are ready for something more professional than Microsoft Word/Publisher but less intimidating than Adobe InDesign. Personally, I've found it so easy to use and it's upped my design skills.

But a new development has made me even more excited about Canva. A few months ago, they rolled out Canva for Work, which takes the free Canva account and upgrades it with a paid subscription for special features. I was intrigued, but I didn't try the trial because I was afraid I would fall in love with it and I wasn't ready to pay. But then I got a tip from the Libraries & Social Media Facebook Group that Canva for Work is free for nonprofits. I was disappointed to learn they asked for a 501c(3) nonprofit form first, which we don't have, but then I found out they do accept Tax Exempt forms.

I immediately upgraded my work account. They put it on a trial mode and then when the trial ended, they accepted our nonprofit status. Yay!!!

And I LOVE IT. Here's a picture tour of all the goodies:

In the first photo, I was pleased to see that my personal account was separated from the Canva for Work Team Account. I have to click on my library account to access all work designs.

Easily move between your personal and work accounts!
When you switch over to the Canva for Work Account, your dashboard adds a few new features. As you can see below, you can easily see your own designs, the designs that were only shared with you, and your whole teams' designs, called the "Team Stream."

Simple but upgraded dashboard
When you go to "Your Brand", you can make your own templates for Presentation, Facebook Post, Twitter, Instagram, Flyer, Pinterest, Invitation, Letterhead, Business Card, Gift Certificate, Poster, Card, Facebook Cover, and Custom. What a time saver! We use Custom to make images for our Website Slider and our Digital Picture Frame.

Scroll down and make templates for flyers, social media, and more!

The Brand Kit is really awesome! You can save your own colors and they'll default to the top of your color palette in any document. You can upload fonts and set each heading to different font types and sizes. And you can upload your logos for easy locating later.

Brand Kit Part 1: Set your own color palette. These colors default to the top of Fonts, Background, and Elements.

Brand Kit Part 2: Set your own fonts and sizes. Upload the fonts you want!

Your Brand Kit fonts show up in EVERY template as the default setting.

Brand Kit Part 3: Upload your logos for easy locating later.

Brand Kit Logos appear under "Uploads",
in their own folder.
One of the big advantages with Canva for Work is that you can use it with a group of people in your organization. So, you can invite up to ten people to join your "team" and you can set them to be Administrators, Template Designers, or just Members. All teammates can create and share designs. Template Designers are in control of the templates and brand kit and Administrators can do that as well as manage team members.

The benefit of being part of a team is that you can easily show your design to ONLY team members. When you finish your design, you can click on "Showing" in the top right and you'll see that option.


The images will appear in the Team Stream and anyone can easily make changes to it. They just click on your image and then click "Remix". No more having to email everyone through the share option on each design when you want some feedback. So simple and easy to use!

Just click the green "Remix" to make quick changes.
But of course, the greatest feature is their "Magic Resize" option. You can take any design, go to File and then choose which formats you want it in. It was pretty impressive. As you can see below, it kept all the images in the correct proportions and just changed the background size behind it. It wasn't always perfect (sometimes there's too much space and not enough design), but still a huge time saver!

All the options for resizing your current design.
 Example of Resizing:

Size: Small Flyer

Size: Facebook Post

Size: Twitter
And that ends our photo tour. If you really enjoy Canva, I highly recommend upgrading to Canva for Work and applying for the nonprofit status. There is so much to gain and all you have to do is scan in a copy of your Tax Exempt form.

Thanks, Canva, for supporting nonprofits!

For more articles on Canva, check out:
Canva: Make Easy Designs in Little Time
5 Secret Tricks to Using Canva Like a Pro

Friday, April 10, 2015

5 Secret Tricks to Using Canva like a Pro!

Back in December, we wrote a blog post about the online program, Canva, which makes designing for social media and flyers a breeze. Back then, we explained how it works and showed screenshots of the easy website.

Today, we're going to share five secret tricks to make Canva work well for the everyday librarian.

#1. Design for Multiple Social Networks in One Image!

The biggest flaw to Canva is that you cannot easily make one design and reconfigure it for the different social networks. There are two ways to work around this:

1. Social Media Examiner wrote a post called "How to Optimize Your Images to Work Across Social Networks" where they figured out the measurements of Facebook, Twitter, and LinkedIn and how you can design one image that when uploaded to all of these networks, will still look great! Your words won't be cut off!


2. One of my coworkers taught me this other trick. When she wants to reuse a design for a different social media network, she downloads the image and re-uploads it in the next format she'd like to use. It isn't as fast as number one, but it will work for any platform!

#2. Skip Canva's Images

Canva used to list the free images first in each section, but recently, they mixed them together and there is no way to search for only the free ones. It isn't worth the hassle to manually search through them. I usually browse the templates to see what I like and then go to free image websites to quickly search for what I am looking for. I still like 123RF, though lately I've been using MorgueFile (http://morguefile.com/) and using images that do not require attribution for a cleaner look.

#3. Download a Color Picker

One great way to pull together your words and images is using a similar color scheme. Download a color picker which will tell you the exact code for the colors in your photo. I really like ColorZilla (http://www.colorzilla.com/), which is an add-on for Chrome and Firefox. It is just an icon that sits at the top of the browser. You click the icon, then  the color you want to copy on your image and it automatically saves the color code. Then in Canva, when you are changing the color, you click the "+" symbol and you can paste the code on the bottom. Ta-da - instant match!


#4. Use a Color Combination Finder

Do you have trouble knowing which colors will look great together? Use a color combination finder to quickly recognize complimentary colors! I really like Coolors (http://app.coolors.co/). You can type in your color code (which you can get from the Color Picker above) and just press the space bar to find other color combinations. When you find one that you like, you can just copy that code back into Canva.


#5. Pay Attention to the Advanced Features!

Did you know that you can blur the background or change the color tint of an image? It is easy! When you click the image and then the toolbar, you will see the option to Filter. In the Filter box, you'll see "Advanced" in small letters on the bottom left. Click on that for these great options! If you want them to disappear, just click on "Simplier" on the bottom left.


Bonus Tip!

Do you want to move fonts and images as one group? Just click outside of the image window  (in the grey area) and (while holding down the left click on your mouse), drag the mouse over all elements you wish to move. Let go of the click and then use your arrow keys to move the group.

If you have any other suggestions, please share below!

Friday, December 26, 2014

Canva: Make Easy Designs In Little Time

This article has been updated here: http://www.5minlib.com/2017/05/canva-update-2017.html

I am very excited to talk to you today about Canva, a free online program which helps anyone create very awesome designs in very little time. This is a fabulous tool for the designer in your library, the person(s) who does your fliers and social media.
They launched just over a year ago and are quickly becoming the hottest new program for any designer. I've been hearing about it for months, but had been resistant to trying it out because it took a while for me to master Publisher. I had no time or interest in trying to master another program.

But that's the beauty of Canva. It isn't something that you need to master. It is very easy to use and their quick two minute tutorial can send anyone off to use their program successfully.
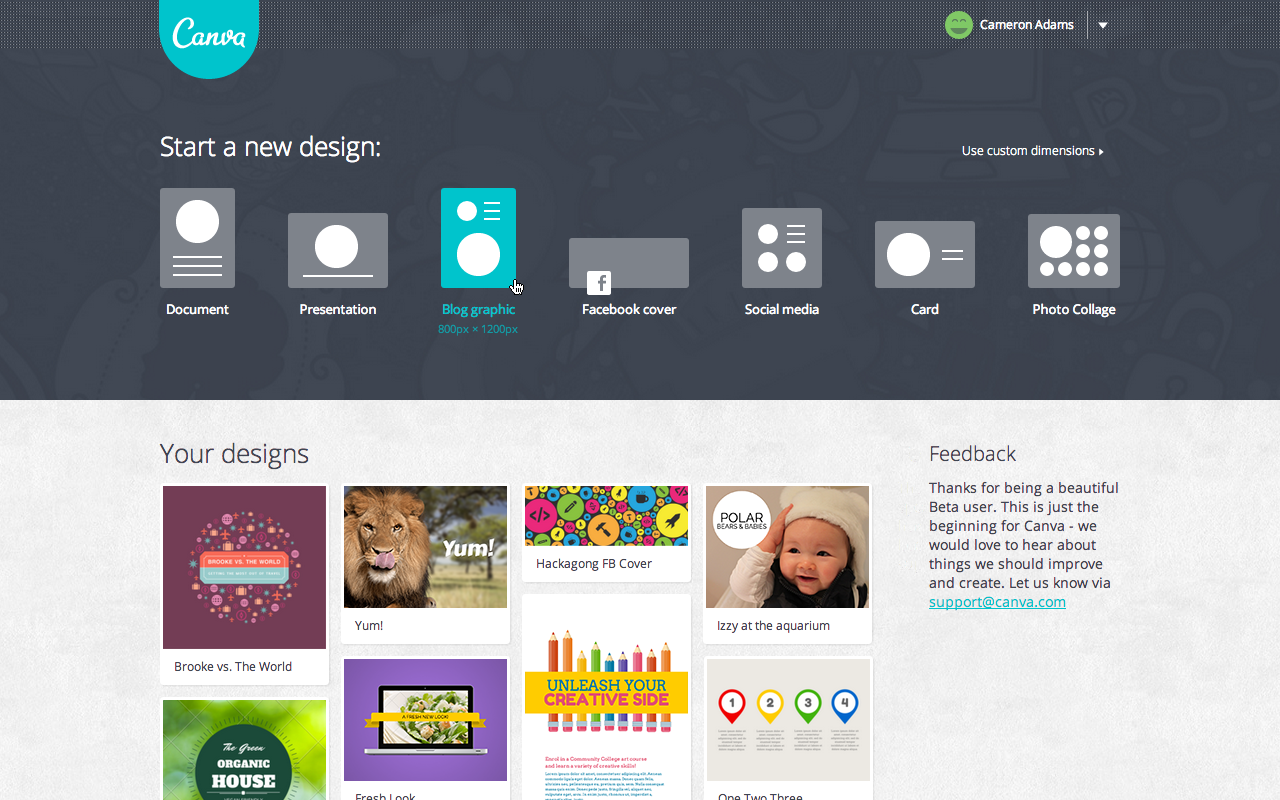
As you can see from the screenshot above, when you log into Canva, the first thing you do is select what kind of design you are making.  So, if you're doing a new Facebook cover, a poster, or a Twitter image, you just click on that design and the dimensions are already preset for you.
You can start from scratch or you can pick one of the templates that they offer on the left side. It is easy to search through them and adapt them to your needs. They do offer some free images and backgrounds and you may upload any of your own, but they also provide many different images that you can purchase for $1.

The only downside to this program is that they do not offer a generic template for all social media or a way to reuse one design in a different template. So, if your library is on Facebook and Twitter and you want to post the same content, you will need to recreate the second image from scratch. Yes, you can use a Facebook image for your Twitter account, but keep in mind that Facebook's ideal dimensions are different than Twitter's ideal dimensions, so your Facebook design will get cropped awkwardly in Twitter.
For the nondesigners, Canva also offers design school of short tutorials to teach you the basics to make any social media design look professional. And they also stream any images that people make public, which might inspire more designs for you to create for your library.  You can follow us at https://www.canva.com/5minlib.

Happy designing in 5 minutes!